Looking for a compact and inexpensive radio which runs OpenTX? Well here's something to put on your shortlist - it's the new TX12 from Radiomaster, and it's possibly the smallest and cheapest OpenTX transmitter currently on the market.
I've been playing - and flying - with a pre-production unit for the last couple of weeks. Read on and find out if this little baby is for you...

Full disclosure - Radiomaster kindly sent me a pre-production unit to evaluate. RM did not seek or receive access to this review prior to publication.
A small transmitter!
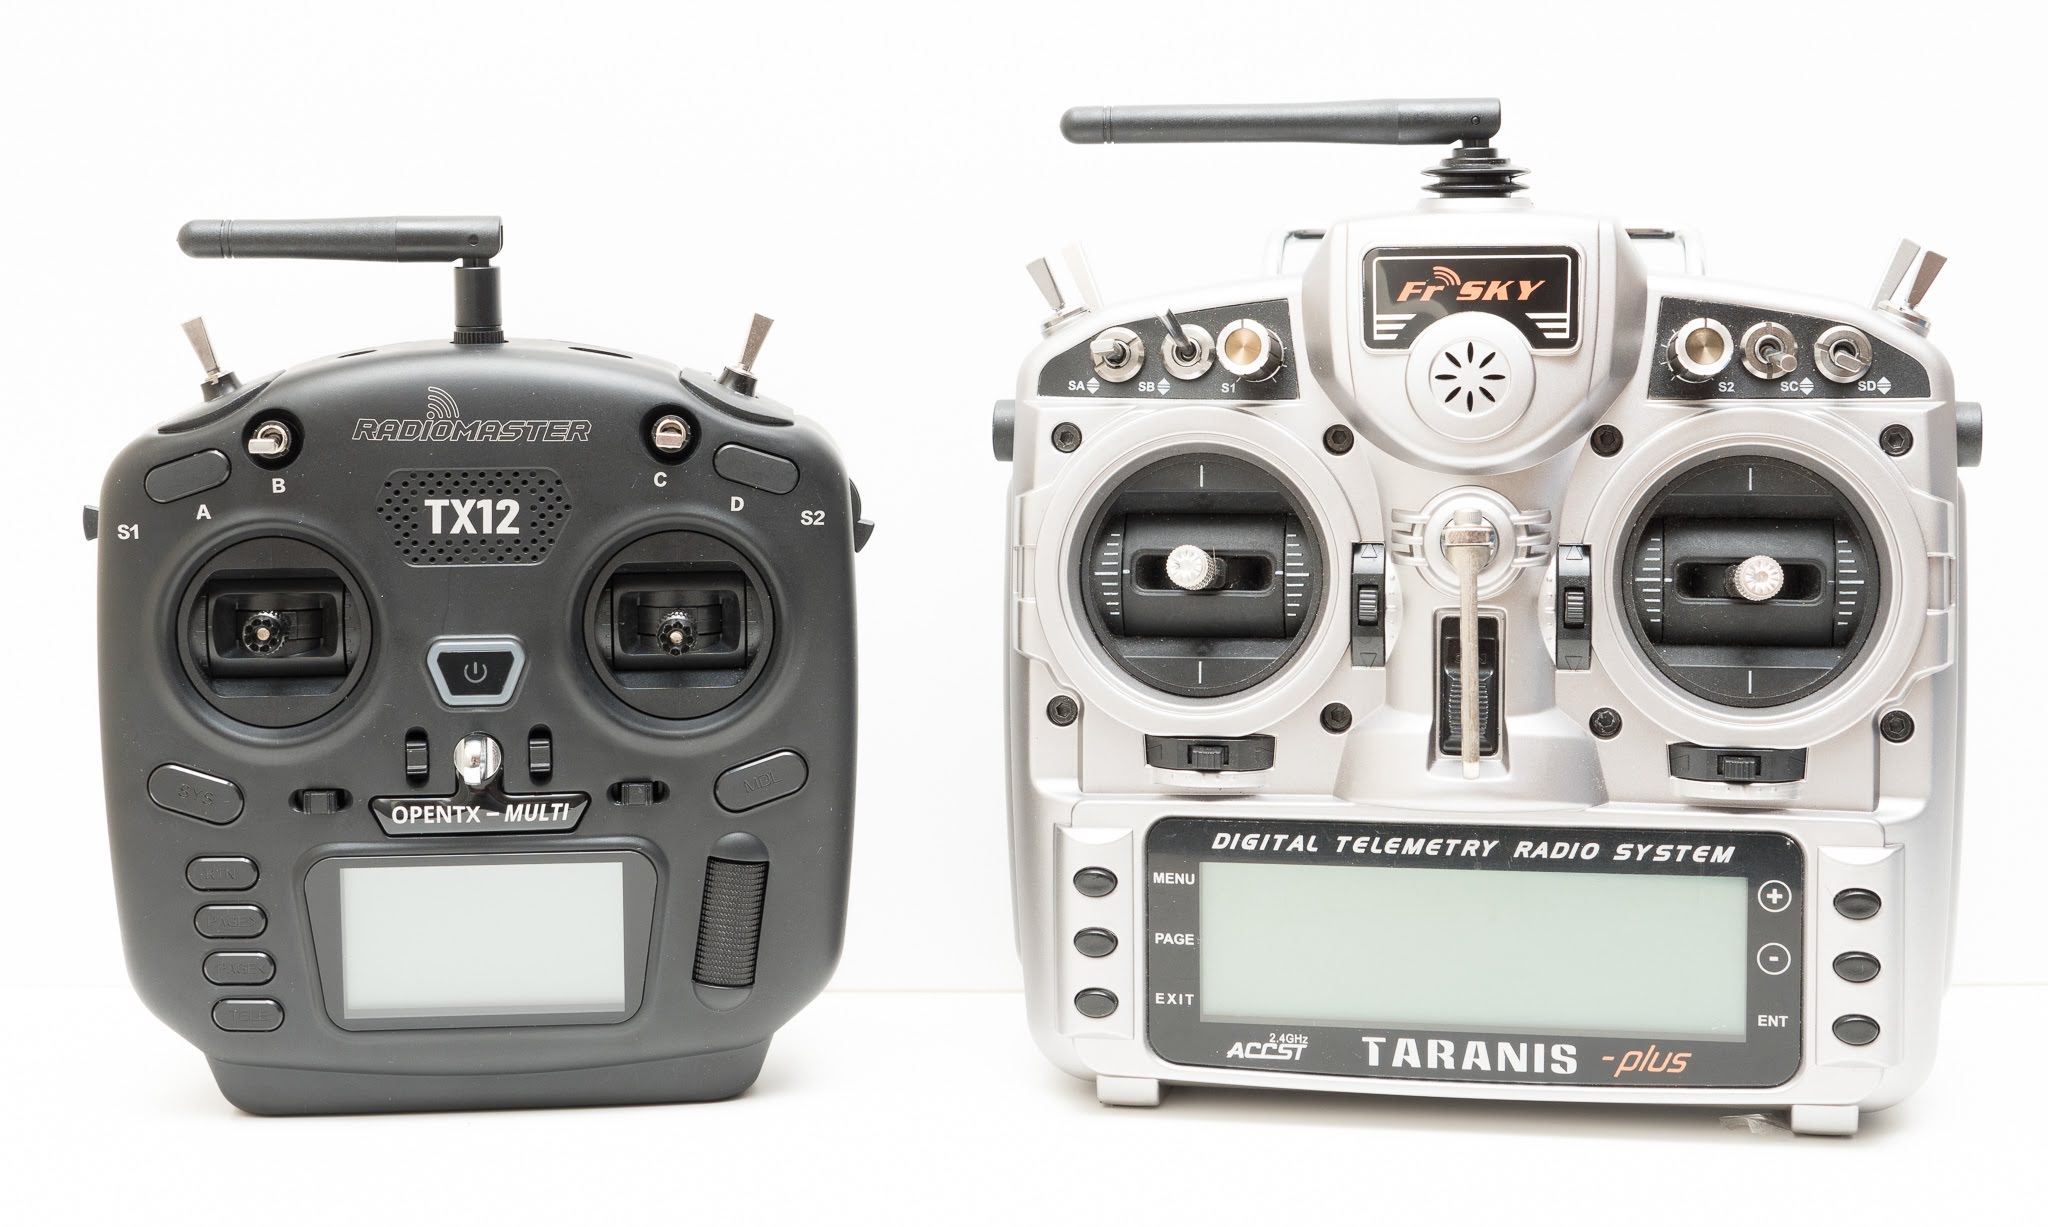
Remove the TX12 from the simple packaging, and the first thing that strikes you is its size - this transmitter is small - and I mean small! Here it is, next to the FrSky X9D:
Dig in the box and you'll find some accessories:
- A USB-C cable for charging and data transfer
- An antenna (yes, it's removable)
- A plastic plug for the antenna exit
- An instruction leaflet (very bare, but this was a pre-production unit)

Ergonomics
The shape of the TX12 is all curves and smooth surfaces. It's okay to hold, though a bit on the small side for medium sized hands. The main issue is the stick spacing, which is rather tight.
Another niggle is that the the rear grip could be a little deeper. If using it for DLG, I'd be inclined to apply a non-slip covering over and around the grip.

There are some nice touches, like the folding handle:

The trainer and USB ports are in the right place, at the top of the unit:

Fit and finish are adequate, if not quite up to the standard of the TX16S.
Switches, buttons and sliders
The TX12 sports four switches, two sliders, and two momentary buttons. All are symmetrically arranged.
Switches
All four switches are 3-position. If you need a 2-position switch, you’ll need to replace one of them, and this will involve some soldering.
The quality of the switches seems fine. However those on the front are, rather annoyingly, angled slightly upwards.
Momentary buttons
There are two momentary buttons labeled A and D. They are electrically similar to regular momentary switches - the only difference is you have to take your thumb off the stick to operate them. They're fine for RSSI and voltage callouts and so on. With some simple programming, they can emulate push-on, push-off switches.
At first, the buttons look good for DLG launch switches, but in practice the press action and their location make it all rather awkward (yes, I've tried).

Sliders
The sliders are welcome at this price point. However they feel imprecise and the centre detents are vague. I've since printed my own levers with a non-slip finger pad, and the feel is much improved. The photo below shows the lever as supplied:

And this is my printed version:

Power switch
The power switch incorporates a bright 3-colour LED. Blue for booting, red for blocked/charging, and green for transmitting.
Delays for startup and shutdown can be configured in the Radio Settings menu. If you're really impatient, you can also disable the splash screen.
Antenna
The antenna is removable. A warning sticker reminds you to attach the antenna before powering up the transmitter with the internal module active - otherwise you risk frying the module. I'm keeping my antenna permanently attached.
Gimbals
As expected at this level, the gimbals are all plastic and use conventional pots rather than Hall sensors. The soldered joints are well supported and there's minimal flexing of the cables. It's nice to see that the shafts are ball raced.

Stick length and spring tension are adjustable after opening the case. The tension out of the box was too strong for me, and I ended up reducing it to the minimum. Once properly adjusted, I found the sticks nice to use.
The throttle axis has a friction strap. I had to tighten mine down to achieve sufficient friction. It would be nice to have a ratchet as well, but - as the photo shows - there's insufficient room for two straps.

[Edit Feb 2021: the throttle pot on my unit has developed a problem. A perfect excuse to check out the RadioMaster support ticket system - I sent a vid and description, and have now received a replacement gimbal.]
Screen
The screen is a backlit 128 x 64 monochrome panel, similar to those used on the Q X7, X9 Lite etc. The backlight is only needed in dim light, and is configurable in the radio settings menu.
Sound
The sound from the single speaker is loud and clear - top marks here.
Firmware
My TX12 came with a development build of OpenTX 2.3. The transmitter worked out of the box, however functionality was limited as no SD card was provided. I dug out a spare card, and populated it with files from the Radiomaster website.
I also downloaded the latest nightly build of the Companion 2.3.11 from the OpenTX site. The sim for the TX12 is not yet supported, but that will no doubt be corrected for the final firmware.
Programming controls
The programming controls follow the example on the TX16S, with six buttons and a knurled metal scroll wheel. All have a nice positive action. However, I feel that the six buttons are overkill - the FrSky X9 Lite which has just three buttons, yet is easier to navigate.

The TX12 incorporates the small-screen variant of OpenTX, with some menus split into sub-menus. Programming can be a little fiddly (you'll probably want to use Companion for larger projects), however the functionality is the same as any other OpenTX radio.
Internal construction

The back comes off to reveal a single large printed circuit board, with neatly arranged wiring. The RF module is soldered directly to the board.
Having everything on the main board is great for reliability. The only downside is that if a subsystem fails, it may mean replacing the whole board.

The switch wires are soldered without the usual heatshrink tube. I have no problem with this - on the contrary, it makes it easier to replace a switch.
RF and protocols
The internal multi-protocol module contains a single RF chip, the CC2250. This supports Graupner HOTT, FrSky D8/D16, Hitec, Futaba S-FHSS and just a few other protocols. Spektrum protocols are not supported.
One benefit of using a single chip module is you get full power from the CC2250 (with the 4-in-1 modules, the power from the CC2250 is 1db less, equating to around 12% less range for those protocols which use it).
For FrSky users, the MPM supports cloning of another transmitter running D8 or D16 (v1 or v2, LBT or FCC).
The designers have somehow found room for a JR-style external module bay, thus extending the protocol options to Crossfire, Spektrum, M-LINK etc. If using an external module permanently, it makes sense to remove the main antenna (remembering to disable the internal RF to avoid damage).
Battery and charging
The battery arrangements on the TX12 are simple and flexible. Two 18650 batteries fit into a tray which slides in from the bottom. At first it seems an impossible fit, but it all works beautifully. The tray plugs into the main board via a 3-pin balance connector, so it can be removed for external charging if required.


Charging
The built-in charger is a great feature at this price point. Simply connect to a USB source using the included cable - the status LED goes red to indicate charging, and goes off when it's complete. Done!
The USB-C port is also used for data transfer with the Companion
software, and for controlling a sim.
Flight tests
For the flight tests, I flew my Mini Ellipse. This is a 1.5 meter sloper which I've modified for six servos and crow brakes. To control the model, I used my F3F setup and crow aware trim Lua script. It's a complex setup, yet it runs very happily on the TX12!
The receiver is a FrSky G-RX6 with ACCST 2.1 firmware.
As for the flying.... it took a couple of flights to familiarise after which I felt perfectly quite at home, although the transmitter felt just a little too small for my regular sized hands.
There were no RSSI warnings or glitches - it all felt 100% solid.
I also flew my Ahi., using a simpler template. For this model, I configured one of the buttons as a 2-state toggle for high/low rates.
[Edit: I've since had two more sessions with the TX12, and the more I fly with it, the more I marvel at this little powerhouse. A tip: if using a neck strap, use thin straps to avoid obscuring the screen.]
Conclusions
Despite its small size, the TX12 is a versatile and fully capable OpenTX transmitter. The inclusion of USB charging makes it especially attractive. Above all, this transmitter is great fun to use.
There are just a couple of niggles. The sliders, though a nice surprise at this price point, are rather feeble. Also the momentary buttons, while useful in their own right, can't make up for the lack of a proper 2-position switch - if you fly DLG you'll definitely want replace a shoulder switch with a proper momentary launch switch.
Finally, the weak point of any cheap radio is going to be the potentiometers, and a Hall gimbal option would be very welcome.
The usual caveats about OpenTX apply - I love it, but some find it tricky to program so please do your research first.
Overall, the TX12 is a good choice for simpler gliders, foamies, simple e-flight models, controlling a sim, flying a quad... or just learning about OpenTX. And, at just £55, it's a steal!
Specifications
- Size: 170*159*108mm
- Weight: 363g
- RF Chip: Single-chip Multi-protocol(CC2500)
- Supported Protocols: Corona, Hitec, Futaba S-FHSS, Frsky D16/D8, RadioLink, Graupner HoTT
- Transmitting Power: 20dbm (100mW)
- Antenna Gain: 2db
- Working Current: 160mA@8.4V
- Voltage Range:6.6-8.4v DC
- Range: > 2km @ 20dbm (depending on receiver)
- Radio Firmware: OpenTX(Transmitter)/ Multi-Module(RF module)
- Channels: Up to 16 (depending on receiver)
- Display:128*64 Monochrome LCD display
- External module: JR/FrSKY/Crossfire compatible
- Upgrade Method: USB/SD card* & OpenTX Companion PC software.
9 comments:
If you can get one of these from BG at the moment you are doing very well - my two order attempts have both been cancelled for "logistical reasons" despite other parts of the orders coming through. Banggood couldn't tell me what they were though; bloody Covid/Brexit!
Update - apparently these should be available in the UK from mid Jan 2021, Brexit delays permitting... https://www.hobbyrc.co.uk/radio-transmitters
Can the tension be adjusted without voiding the warranty? There seems to be a void sticker between front and rear halves.
There is a void sticker and I guess in theory a warranty claim could be denied on that basis (since stick adjustment is not in the user guide). You could check with RM support if you're concerned.
Hi Mike,
Great review!
Would you use this TX with a large carbon F5J model?
Thanks
SF
Hi SF, the TX12 is good for casual flying, foamies etc. but for high value carbon models I'd leave it behind for something with more heft and higher quality mechanics.
Ahi and Wingy converted over easily for me which is perfect since it'll be a beach transmitter and that covers most of my dune flyers. I tried importing the F3F template but I need to figure out what it didn't like about some of the logical switches.
Thanks for the great review!
@Dan, for F3F v5:
FM switch: In logical switches L6-L8 and L22-L24, change 'SA' to 'SB'
Camber: In CH10->Camber, change mixer sources to 'MAX'. Repeat for CH11.
Thank you Mike,
I simply went back and glanced at the reference spreadsheet which is included in the template packet and that all came clear. Thank you for verifying.
Dan
Post a Comment