What's this dinky transmitter on my desk? It's the Pocket - the smallest in a series of compact transmitters from RadioMaster. It comes with a choice of modules (ELRS or CC2500 MPM) and is very keenly priced. Oh, and it's stored in a little pouch!
Spoiler alert: the Pocket may only cost £65 yet, in terms of programming, it’s more than a match for £1000+ radios. I know because I've flown an F3F model with it, with all the mixer bells and whistles. Crazy times!
Read on and find out if the Pocket is for you...

What’s in the box
Aha, that tiny box! Can it really contain a transmitter? Well yes... and there's more inside:
- Carry pouch
- Instruction leaflet (very basic)
- USB cable
- Sheet of decorative transfers
- Screen protector
 |
The transmitter takes two 18650 LiIon batteries (not supplied).
Design and build
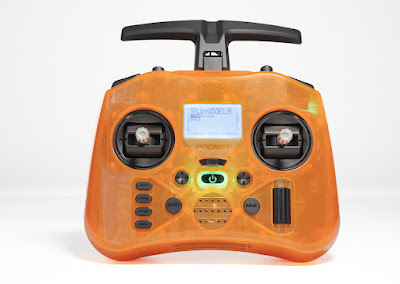
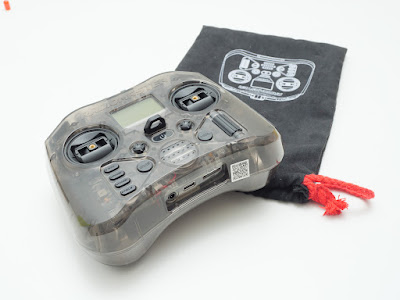
Put on your sun shades, because the Pocket is offered in a range of whacky colours including transparent blue, pink, green, and orange. Mine was supplied in Classic Charcoal, but I also received an additional shell in orange. I think the orange looks rather fun!
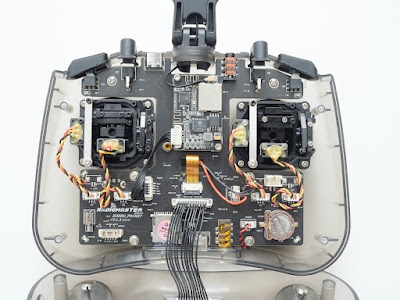
Changing the shell. To replace the shell you have to completely disassemble the radio and some care is needed when unplugging the antenna connector from the PCB. First, carefully scrape off the yellow glue, then lift off the connector cleanly to avoid distorting the contacts.
Removing the antenna is another tricky task. It has a split collar and strong fingers are needed to squeeze it through the hole in the shell. Release the motherboard first, to give your fingers more room to work.
Don't be deceived by the low price - the shell is a super nice moulding.
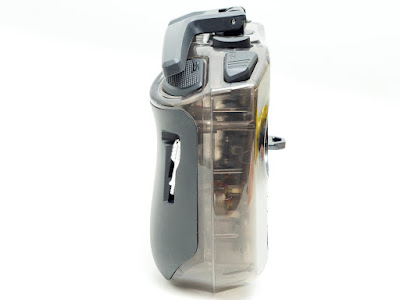
The side cheeks are removable for access to the batteries and gimbal adjusters. They're made of a flexible plastic with a non-slip texture.

The antenna can rotate through 90 degrees in the vertical axis. When not in use, it can be folded back. In addition, the sticks can be removed and stowed in the side grips.
With the antenna and sticks out of the way, the Pocket fits snugly in its pouch.
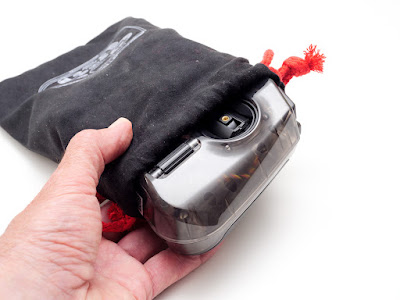
The pouch is no gimmick - it means that the tx can be carried in the side pocket of your backpack, freeing space for other stuff like sandwiches, camera etc. My only niggle is that the pouch is a bit tight - 10mm extra width would have been handy.
Ergonomics
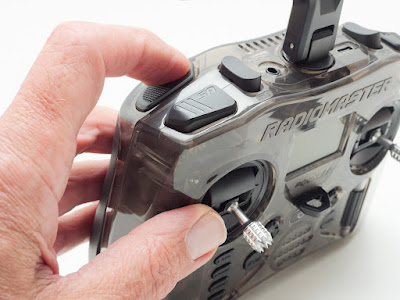
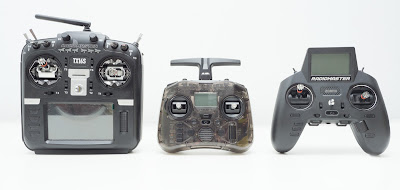
Despite its small size I found the Pocket to be nice to hold (I should say here that I'm a thumber). A useful metric is the distance between the stick centres - on the Pocket, it's 82 mm, compared with the 90 mm for the Zorro and 77 mm for the (rather cramped) TX12.
For prolonged flying at the slope, I like to use a neck strap and it balances perfectly. For DLG, the grip is okay though not as secure as on the Zorro.
All in all, considering its size, the designers have done a splendid job with the ergonomics.
Gimbals and trims
I'm not a gimbal snob, but I do like my gimbals to be robust, adjustable, and to centre consistently.
The gimbals on the Pocket are very small, all-plastic units. Compared with the TX16S gimbals they're tiny. They're even smaller than those on the TX12 and Zorro. Even so, they have Hall sensos and ball-raced shafts - both nice to see on a budget set.
Sticks
The sticks are removeable and are stowed in a recess in the side of the case when not in use.
You can't adjust the length, however RadioMaster offer stick extenders which screw in between the gimbal and the stick.
The stick tops are very sharp as delivered - I have run a needle file over them just to take the edge off. Also the sticks can work loose, so it's a good idea to check them between flights. When removing them take care not to let them drop in the long grass!
External gimbal adjustments
Each gimbal has three adjuster screws, accessible through holes in the case. Two are for adjusting spring tension, and one is for disengaging the spring on the throttle axis.
To access the screws, you have to remove the side cheeks first, which is easy enough. Replacing the cheeks is a little fiddly, though. Fortunately you won't have to do this very often.
The adjuster screws have hex heads.
Trims
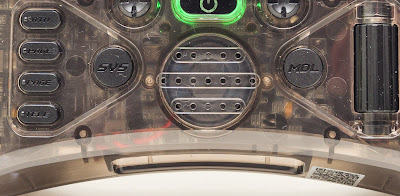
Instead of the usual trim levers, there are two miniature 4-way joysticks. These are located either side of the power button. Locating them by feel takes a little getting used to, but they actually work fine.

All in all. I found the gimbals and trims to be perfectly adequate for sailplane applications.
Switches and controls
The Pocket has a good selection of buttons and switches.
For your flight mode switch there's a choice of two 3-position rocker switches. These are located either side of the antenna.
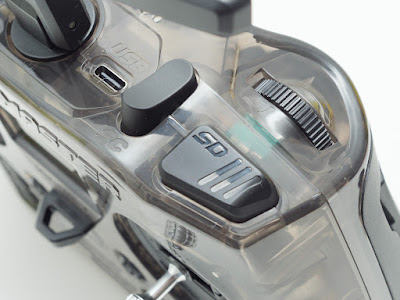
Located on the front shoulders are two push-on/push-off switches. A green LED lights up when in the 'on' position, however it's not easy to see - I would program voice callouts for any critical function.

On the rear left is a momentary button, again with a large pad. This should be good as a DLG launch switch - as long as you launch with your right arm (the switches are soldered to boards, and are not easily swapped).
Finally on the right rear shoulder is a nicely damped roller which could be used for, say, camber control.
Programming controls
Anyone who has used a RadioMaster transmitter will immediately feel at home with the Pocket. That is to say:
- The MDL button take you to the Model menu.
- The SYS button take you to the System menu.
- The TELE key takes you to the telemetry screen.
- Navigation is performed using RTN, Page up, Page down keys, and the scroll wheel.
- Press the scroll wheel to confirm your selection.
The buttons have a nice positive action, however the scroll wheel has a slightly loose feel on my unit.
Light, sound and external connections
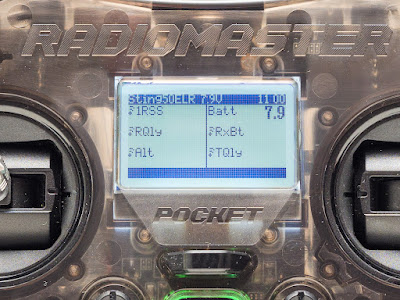
The LCD panel is located in the ideal position for viewing. It's very small, however I had no difficulty reading the menus thanks to the bright and contrasty display.
Sound from the front-mounted speaker is loud and clear.
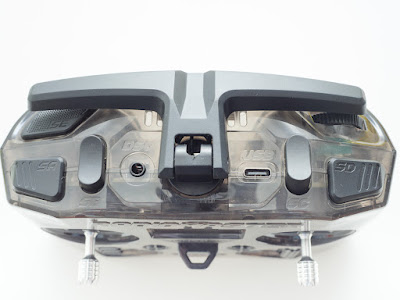
Along the top are DSC (trainer) socket, and USB data port.
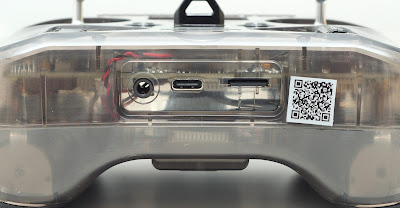
On the bottom are a headphone jack, USB charge input, and MicroSD card.
RF module
My Pocket was equipped with an ELRS module.
Thanks to receivers like the RadioMaster ER6G, ELRS is now a viable alternative to traditional protocols like ACCST for fixed wing/line of sight applications, and early testing with an F3F model confirms that it works well in this role.
The unit is also available with the CC2500 MPM (multi-protocol module). This supports the FrSky ACCST D8 and D16 protocols and a few others. However it does not support Spektrum or Flysky protocols - for that you will need an external 4-in-1 nano module.
Firmware
The review unit came with a beta version of EdgeTX V2.10.0. The RF module was loaded with ELRS v3.0.1 LBT.
After configuring the ELRS passphrase, I successfully bound the Pocket with an ER8G receiver running ELRS v3.2.1.
Link quality with LBT firmware
With a receiver connected, I noticed that the link quality (RQly) was bouncing between around 88% and 98% - even at close range. Turns out this is expected behaviour with the LBT firmware. With the FCC firmware, RQly should return a steady 100%.
For both the LBT and FCC versions, the low and critical RQly levels are 50% and 20% respectively.
Programming EdgeTX
The usual caveats apply with EdgeTX. If you're a first time user, then may find it a little strange. You can't just work it out of the box - some research and digging is required. It's worth persevering though, especially if you have decent technical skills, because it has unrivalled flexibility. See links at end.
Lo-res interface
This version of EdgeTX is optimised for low res screens. It's a little less easy to navigate than with, say, the version on the FrSky X9D. In any case, the tiny screen means that programming is better done using Companion.
Loading a test setup
I like to push the boundaries - and the cheaper the radio the harder I push! So I loaded it with my F3F setup with 50+ mixers and adaptive trim Lua script. The idea was to fly it with my Sting F3F model.
The first task was to migrate my F3F setup from the TX16S, using Companion. There were just two problems: first, the Pocket was not yet supported by EdgeTX Companion. Secondly, the TX16S was running OpenTX, not EdgeTX.
So the conversion had to be done in steps.
First, I converted my TX16S setups into EdgeTX format. I did this by importing the TX16S models into EdgeTX Companion, using a Zorro profile. Next, I extracted the YAML file from the ETX file (see note below). Lastly, I copied the YAML file to the /MODELS folder on the SD card. To my relief it was successfully recognised. With one or two adjustments, it was ready for flight!
The Pocket will no doubt be supported by EdgeTX Companion soon, allowing existing setups - whether EdgeTX or OpenTX - to be migrated in a single step.
Tip: .ETX files are actually zip archives. To extract YAML model files from a .ETX container, change the file extension from .ETX to .ZIP, then expand. The YAML model files are contained in the /MODELS sub-folder.
Flight testing
For flight testing I used my Sting F3F slope racer equipped with six servos, 4-cell NiMH pack, and ER8G receiver. This is my 'hack' F3F model which I use for testing new radios. The session took place at Ivinghoe Beacon, my local slope 60 km north of London.
The session was uneventful. In fact, I much enjoyed using the transmitter. Partly because it was so comfortable that I almost forgot that I was using a small transmitter. And partly because it became something of a talking point with my clubmates!
Pocket v. Zorro
The Pocket and Zorro are both compact transmitters, and inevitably there's some overlap in features.
I have already reviewed the Zorro. Comparing the two radios, the Zorro wins on screen size, ergonomics and number of switches. It's also available with a 4-in-1 module which supports Spektrum and Flysky protocols. Plus, it will accept the AG01 Mini CNC gimbals.
The Pocket wins on portability, larger capacity batteries - and price.
Verdict
It’s hard not to be captivated by the Pocket. It's cleverly designed and surprisingly well featured for such a small and inexpensive unit. The ability to carry it in a pouch is no gimmick.
Sure, there one or two compromises due to its small size, like the shallow grip and reduced number of switches. And the small screen will be a negative factor if you do lots of programming directly on the transmitter. (If, like me, you program using Companion then screen size will not be an issue.) But overall it's thoroughly practical little tx.
If you've never programmed EdgeTX before, make sure to do your research before committing. It's incredibly powerful, but the learning curve is steep.
The Pocket should appeal to these groups:
- Slope soarers who like to combine flying with hiking.
- Sport flyers who just want an ultra compact radio.
- Right handed DLG flyers.
To sum up, the Pocket is an intriguing and capable ultra-compact radio. I think RadioMaster have another winner on their hands!
Specifications
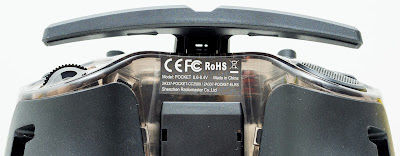
- Dimensions: 156.6*65.1*125.3mm (Folded size) /156.6*73.1*154.8mm (Unfold size)
- Weight: 288 grams
- Operating frequency: 2.400GHz-2.480GHz
- Internal RF Options: CC2500 multi-protocol / ELRS 2.4GHz
- Supported protocols: Module dependent
- RF power: CC2500 20dBm max / ELRS FCC: 24dBm max / ELRS EU-LBT: 20dBm max
- Operational voltage: 6.6-8.4v DC
- Control distance: > 2km @ 20dBm
- Operating system: EdgeTX
- Control channels: Maximum 16 (Receiver dependent)
- Display: 128*64 Monochrome LCD
- Battery: 2pcs 18650 batteries (Not included)
- Charging: Built in USB-C QC3 Charging
- Upgradable Firmware: Via USB or the included SD card
- Gimbal: Hall-effect
- Module bay: Nano size (Compatible with RadioMaster Nano-size modules, TBS Nano Crossfire / Nano Tracer )
5 comments:
Hi Mike,
I's been out of the hobby for quite a while but am trying ot get back in and up to speed. .a lots changed with ELRS. MKII and Pocket Radios were all new and a fun adventire getting my models set up on these Radios..
You helped me in the past with a full house glider set up that was phenominal and I do appreciate it..
I' also find this review of the Pocket very timely since I tried usinga Zorro Radio Type in Companion 2.9 and got an error.. "Proceed anyway" .. and I replied no.. Ill say YES then try converying the models per this guide..
Thanks Again
Jim Snodgrass jims123@gmail.com
Mike, I just wanted to leave an update on my experience with the POCKET over the last month.. Basically it's been great. Its bright screen, loud / crisp speakers, and amazing capability have made it perfect for for me. I love taking friends and family out to fly my planes and they can adapt to this little radio much quicker than say a TX16S sized radio.
Its very light and portable and I have been using it with a RM 4in1 nano in the JR Bay to provide the wireless DSM link CH1to4 trainer data while my MKII ELRS radio supports the RF link to the planes.. Its worked really well. I'm still looking for the compatability with the next 2.10.x release of the firmware tho..
Thanks jimS
Great extra feedback, thanks!
Question, will any of your glider programming like dlg or f3c work with this radio? Thanks Enrico
Yes, though you may need to reassign some buttons and switches. Instructions are on the Setup Guides.
Post a Comment