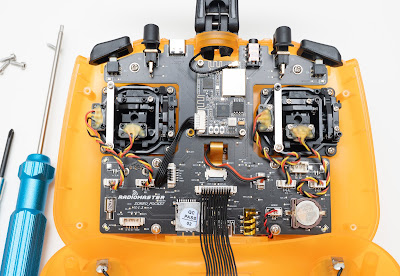
The Radiomaster Pocket is a wonderfully versatile little transmitter - it can be used for anything from cheap foamies to high-value moulded models.
If it has a weakness, it's the rather ordinary gimbals - with their all plastic construction, they lack the precision feel of the AG01 CNC gimbals which I have come to love on the TX16S.
Well, it seems that Radiomaster have an answer to this: a CNC gimbal specifically designed for the Pocket. They've called it the AG01 Nano. (Not to be confused with the AG01 Mini, which targets the Zorro and TX12.)
 |
| AG01 Nano gimbal |
Long story short, I decided to order a pair.
First impressions
First impressions didn't disappoint - the AG01 Nano’s came nicely packaged in a long black box.
Inside the big box were two smaller boxes. Each contained a gimbal, an alternative set of springs, an Allen key, a set screw (for disengaging the throttle spring), and an instruction leaflet. Both gimbals were self-centring as delivered.
 |
| Box and gimbal (accessories not shown) |
Construction and feel
The centrepiece of these gimbals is the CNC metal construction of the main frame and yolk. As with the original units, each shaft is supported by twin ball bearings. It all feels reassuringly rigid.
 |
| Main components (apart from centring rocker) are metal |
Stick travel is silky smooth. The end stops generate a subdued 'clack' - just enough to say 'CNC'. This is the most obvious tactile difference from the regular units.
The feel at the centre position is pretty much the same as before, a consequence of keeping the same plastic rockers. I think this is reasonable given their tiny size and intricate shape. Crucially, though, the centring (as indicated in the Analog debug menu) is nice and precise.
Removing the old gimbals
The first task is to remove the old gimbals. Start by opening the transmitter: peel off the rubber cheeks and undo four Allen-head screws. Then remove the batteries and gently separate the two halves.
A ribbon cable spans the two halves and it's a good idea to release one of the connectors in order to completely separate the mouldings. Loosen the connector first (by rocking end to end), then pull it away gently.
To remove the old gimbals: undo four screws securing each faceplate then disconnect the cables from the main board.
 |
| Case split open ready to remove the old gimbals |
Preparing the new gimbals
With the old gimbals removed, it's time to prepare the new units.
The first job is to configure the throttle axis. Start by disengaging the centring spring using the supplied set screw. Next, tighten the friction strap to taste.
The next task is to adjust the spring tension on the remaining three axes. In order to achieve a well defined centre I set the tension to the maximum by screwing the adjusters as far as it would go. For those who prefer even higher tension, the supplied set of tighter springs can be fitted.
[Optional] using damping oil
If you've ever bought a set of full size AG01's, then it's possible that you'll have a spare tub of damping oil lying around. If so, then apply a tiny amount to the Nano's, between the friction wheel and the metal strap. The result will be a nicely damped throttle action. Only a tiny amount of oil is needed - any more will just gum up everything, and it's difficult to remove.
Fitting and calibration
It's now time to fit the new gimbals in place. And this is where I came across the only real issue: the mounting screws were binding in the faceplates instead of being a loose fit. If left uncorrected, it could lead to stripped threads when screwing into the front moulding. I worked the screws in and out of the faceplate in order to free them up and there were no further issues.
Once the case is screwed back together, further adjustments to stick tension can be made via holes under the rubber grips (it's not necessary to take the shell apart).
The final task is to go to the System>Hardware menu and calibrate the new gimbals.
 |
| EdgeTX System>hardware menu |
Stick tops
The stick tops are identical to those on the original gimbals. And, like the originals, the tips are very sharp. A few passes with a needle file fixed this!
 |
| AG01 Nano gimbals ready to go! |
Conclusions
Overall, I'm pretty happy with the AG01 Nano's. While the overall feel is similar to the regular sticks, they are more rigid, centre precisely and provide that little extra confidence when flying high performance models. They also add a touch of class to this clever little transmitter.
If you get them, then do spend a little time to adjust them to your taste, and you will be rewarded!
Specifications
- Item: AG01 NANO CNC Hall Effect Gimbal
- Sensor type: Non-contact hall effect
- Working voltage: DC 3.3V
- Linearity: Real-time (No latency)
- Adjustable vertical travel range: 38°- 54°
- Self-centering adjustment: Yes
- Mode adjustment: Yes
- Adjustable tension: Yes
- Bearing: Quad precision bearings
- Temperature range: -20°C-85°C
- Size: 42*37*43mm
- Weight: 32g(±0.3g)
1 comment:
Thanks Mike. Good review. I really need to "collect" one.
Post a Comment