Fast forward... the Stribog has been assembled, tested, and flown [and won] in competition. Has it replaced the Needle 115 as my number one model? Read on!
 |
| My Stribog at the North of England Open F3F |
Components and unboxing
The Stribog is made by RTGmodel, perhaps better known as the manufacturers of the Rotmilan. Wing span is 2.9m, for me this hits the sweet spot for F3F. As for that name, well apparently 'Stribog' is the old Slavic god of the winds.Fit and finish were well up to the standards expected, except for some specific issues which I'll describe later.
Fuselage
The fuselage is beautifully moulded. It features an integral servo tray with holes pre-cut for KST/MKS 12mm servos. An intricately moulded tail cone covers the aft linkages.An integral ballast tube receives up to 10 steel slugs (supplied), for a total of 900 g. The optional steel joiner adds an extra 1.2 kg.
The V-tail surfaces are driven via the usual plastic rod in tube. No clevises were provided, so I used some spare metal ones. Space is quite tight at the back, and it was necessary to grind a little material from the clevises to avoid binding.
 |
| V-tail linkage (a moulded cover is provided) |
Wings
The wings are very nicely moulded, any traces of release agent were easily removed with isopropyl alcohol.The design is unusual, in that the flaps are are narrower at the root than the tip. This minimises the downward projection of the flaps when full crow is deployed, reducing the chance of damage on landing. It also reduces the turbulent wake over the V-tail when crow is deployed.
Unusually, the servo bays for the alerons and flaps are next to each other and share a common cover. The servo trays are CNC cut from plywood to suit MKS and KST wing servos in both 'mini' and 'normal' form factors.
 |
| Root area with steel joiner installed. Incidence holes needed rework. |
LDS system
An LDS drive system is provided, to suit either MKS or KST servos (specified when ordering). The links are pre-cut from 4mm glass sheet. At first glance, all four links appear identical, however the ones for the ailerons are slightly longer. Some filing of the links was needed to prevent them rubbing against the wing skin.External bearings are provided - these fit in glass fibre holders which must be glued to the servo mounts. To ensure accurate alignment, I glued the holders with the servo temporarily attached.
 |
| Servo tray and LDS assembly. The pencil mark at the left is my filing guide to clear the wing skin. |
 |
| Output wheels. Note larger radius (left) for flaps |
The links are pinned at the control surfaces by means of 2mm steel rods which slide along pockets under the hinges. The rods are threaded at one end, and extracted using an internally threaded tube (supplied). It's a fiddly job, so it's worth optimising the assembly sequence to minimise the number of extractions (just pretend they're your teeth!).
 |
| Flap and aileron servos are adjacent |
For the wing/fuselage connection, I opted for a self-mating arrangement using Multiplex green connectors (not supplied).
Incidence pin woes
A similar problem affected the incidence pegs on one V-tail surface, solved by elongating the holes with a needle file. I also found that the holes in the fuselage for the V-tail joiner were too narrow and needed slight reworking.
Finally, the control surface hinges were very stiff. I was able to free them by relieving the inside of the hinge, using some glass paper bent around 2mm steel rod. It's worth spending time on this to prevent premature wear on the servos.
In the end I managed to overcome these issues, and I'm happy with the final result. However it did add to the assembly time.
 |
| Some custom tools to aid assembly/fettling |
Radio system
To control the Stribog, I am using my trusty Taranis X9D transmitter with F3F Template V5. In the model are a FrSky X8R receiver, MKS servos and a 2S 18650 LiIon battery.With the battery in place, there's precious little space left for the receiver, and care was needed to avoid kinking the antennae. The recently announced RX6R will fit more easily (though it will be necessary to make a Y-lead to connect a battery).
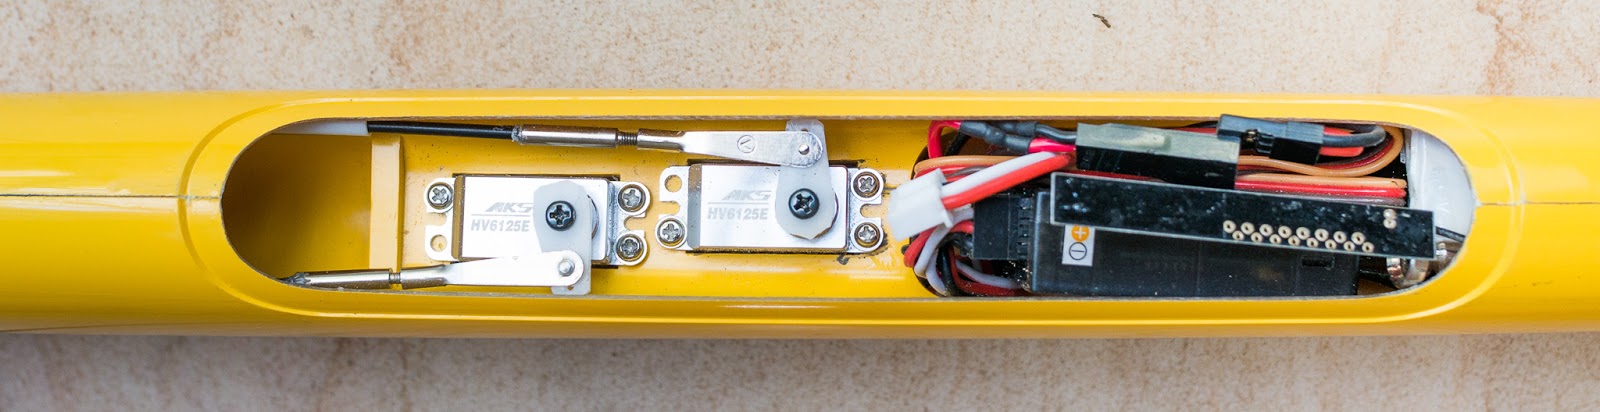 |
| Radio installation. Ballast tube opening just visible at left. |
A fair amount of noseweight was required, via a combination of a lead casting, and strips of lead around the battery.
The steel joiner adds an extra 1220g. In order to maintain the CG position, two slugs are required at the rear of the ballast tube. The steel joiner alone provides a loading of 63.3 g/dm2 rising to 70.3 g/dm2 with max fuselage ballast.
I can highly recommend it, with the qualification that you may have to do a little fettling. I understand that the manufacturer also offers a build service.
Since receiving my Stribog, a 'Plus' version has been released with an ultra-slim fuselage, and ballast in the wing.
Ballast
Fully assembled and balanced, the weight is 2420g for a loading of 39.8g/dm2. With all ten ballast slugs in place, the loading goes up to 54.5 g/dm2, with neglible CG shift.The steel joiner adds an extra 1220g. In order to maintain the CG position, two slugs are required at the rear of the ballast tube. The steel joiner alone provides a loading of 63.3 g/dm2 rising to 70.3 g/dm2 with max fuselage ballast.
Flight testing
The maiden session took place at Ivinghoe Beacon in a 10 mph Westerly. Two flights were flown of 50 minutes in total.
 |
| During first test session at Ivinghoe |
Impressions:
- The model is quick!
- The model is sensitive to camber and reflex settings. It's worth getting your presets correctly dialed in.
- There was a slight tendency to drop a wing when flying slowly with positive camber. Reducing camber on the ailerons has cured this.
- Recommended snapflap travel is pretty large (8mm). I've dialled in some deadband to stop the flaps deflecting during minor pitch corrections.
- The crow brakes are beautifully effective. The recommended elevator compensation was spot on at 5mm.
- The suggested aileron and elevator rates were far too sensitive for my taste and I've reduced them
The second session was in much stronger winds, where the model was really in its element.
Overall
The Stribog is now my number one F3F model. [23/8/18: I have since won the English Open flying this model.]I can highly recommend it, with the qualification that you may have to do a little fettling. I understand that the manufacturer also offers a build service.
Since receiving my Stribog, a 'Plus' version has been released with an ultra-slim fuselage, and ballast in the wing.
Specification (copied from RTG website)
- Wingspan 2867 mm
- Fuselage length 1463 mm
- Airfoil HN Straak
- Elevator airfoil HN modif.
- Weight 2100 - 3900g/4500g
- Total surface: 60.9 dm2
Price as tested (including optional steel joiner): €1470
No comments:
Post a Comment