[updated 2025-12-09 for ELRS v4)
ELRS is a bit of a sleeper - it's been around for a while, but if you're a fixed wing/LOS (line of site) flyer, then you may not have heard of it. You soon will though, especially if you use EdgeTX or OpenTX.
So what exactly is ELRS, and what do you need to get started? Read on, while I take you on a tour. Since ELRS is still evolving I won't cover everything in detail. Instead, I'll provide a overview of the important bits with links to the official documention.
What is ELRS?
ELRS stands for 'Express Long Range System'. It's a combination of hardware, software and RF protocols based on LoRa technology. Compared with ACCST and similar protocols, ELRS offers considerably greater range, as well as the ability to configure your own tradeoff between range and latency.
ELRS was originally conceived for long range use for drones. However, thanks to the introduction of PWM receivers from RadioMaster, Matek and others, ELRS is now a great option for line-of-sight flying. The firmware is open source and suitable hardware is available from several manufacturers.
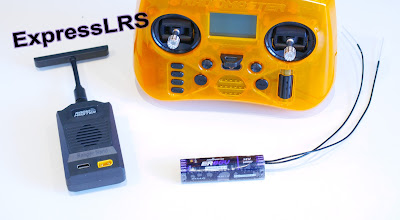
|
|
ELRS devices (clockwise from left): RadioMaster Ranger module, Pocket tx and ER8GV rx |
One great benefit is that devices can be configured and bound 'over the air' - no physical access is needed. By giving all your devices the same bind phrase, devices can be interoperable. Very handy if you want to switch to a backup transmitter, or swap out a receiver.
As for telemetry, some receivers offer integrated altitude and voltage sensors. External Hott telemetry sensors may also be used, and Radiomaster offer a ERS-GPS sensor for use with a selection of their receivers.
What you will need
To get going with ELRS, you'll need:
- a transmitter with a recent version of OpenTX or EdgeTX
- an ELRS 2.4 GHz RF module for the transmitter. The module may be built-in, or external.
- an ELRS receiver
Modules and receivers are available from several manufacturers including RadioMaster, Matek and HappyModel. Devices from different manufacturers can be mixed and matched.
Configuration tools
Unlike traditional radios, ELRS devices require configuration. Yes, I know it sounds like a chore... but it's not difficult once you get up to speed with a few tools. These are:
- The ExpressLRS Lua script
- WebUI
- ELRS configurator
Let's look at each in turn:
ExpressLRS Lua script
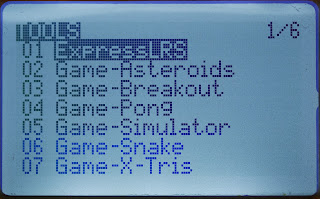
The ExpressLRS script is the traditional method of configuring ELRS devices. The script is accessed from the Tools menu:
|
| EdgeTX tools menu |
The script may be used for the following tasks:
- Configuration of the tx module (packet rate, RF power, switch mode, etc.)
- Placing the tx or rx module in WiFi mode for firmware updates.
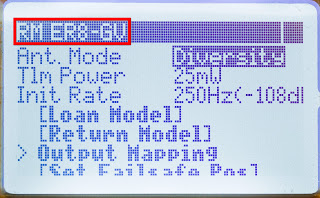
|
| Remote configuration of ER8GV receiver |
How to obtain the script
The ExpressLRS script is available from the ELRS website. For more info see ELRS page.
WebUI
Another way of configuring and updating an ELRS device is via its WebUI.
The WebUI is a web page which is served up by the device's on-board web server. All the code resides in the device itself, so there's no separate software to install or keep up to date.
There is some overlap in features between the ExpressLRS script and WebUI. Where the WebUI comes in really useful is for entering alphanumeric data such as the bind phrase.
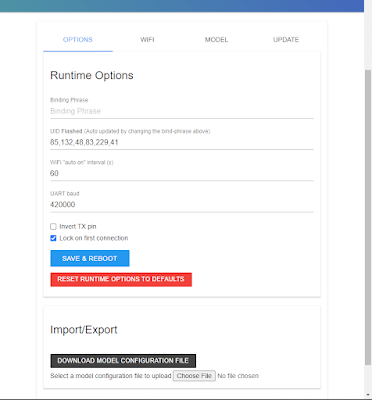
|
| ELRS device being configured via its WebUI |
Enabling WiFi on an ELRS device
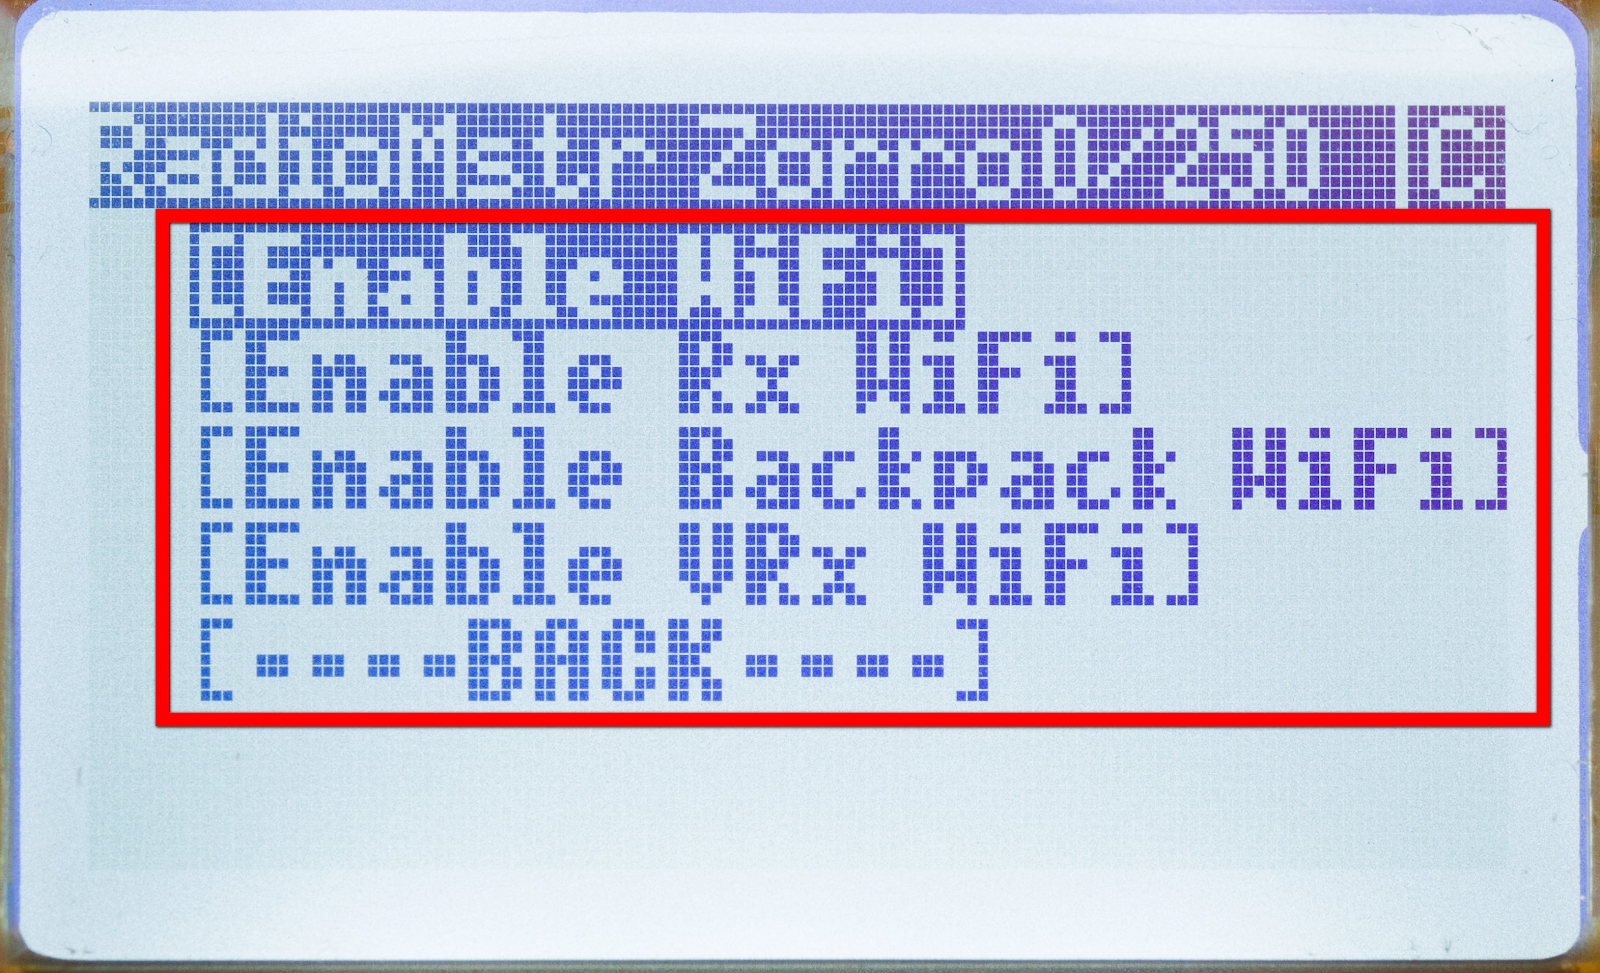
To access a device's WebUI, the device must be placed in WiFi mode. This can be done from the ExpressLRS script:
|
| ExpressLRS script: WiFi configuration menu |
Receivers may use an alternative method: with the transmitter switched off, power up the receiver. After 60 seconds without a connection the receiver will time out into WiFi mode.
Once in WiFi mode, an ELRS may, depending on how it's configured, create its own WiFi access point (AP mode), or join your home network.
Accessing WebUI in AP mode
In AP mode the device creates a WiFi network with name 'EXPRESSLRS_TX' or 'EXPRESSLRS_RX'.
To access the WebUI from your mobile device or computer, you must first switch from your home network to the device's network. Your internet browser should then fire up automatically and display the WebUI web page, if not then type 10.0.0.1 into the URL bar.
Accessing WebUI via your home WiFi
Instead of creating an access point, an ELRS device can be configured to use your home WiFi network. This removes the need for you to switch networks.
To configure a device to use your home network, first connect to it in AP mode and open the WebUI in the normal way. Next, go the WiFi tab and enter the your home network details (network name and pass code). You can then access the WebUI from any computer/mobile on that network.
- Receivers (RX): http://elrs_rx.local
- Transmitters (TX): http://elrs_tx.local
Of course, you must be within range of your home WiFi, so this won't work on the field. (Unless your field is your back garden...). If your receiver can't find the home network, it'll drop into to AP mode.
For more info about WebUI, see ELRS page.
ELRS Configurator
The third and final tool is the ELRS Configurator. The ELRS Configurator is used to (a) remotely build and download ELRS firmware with your own configuration parameters and (b) flash the firmware to a device, via WiFi.
Personally I prefer to use the configurator only to build and save the firmware. For flashing the firmware I prefer to use the WebUI. I find that doing it in two stages is more reliable.
For more info, see ELRS page.

|
| ELRS Configurator |
ELRS concepts and terminology
In this section, we'll look some of the key skills for configuring your ELRS devices.
Binding
The recommended method of binding is via a bind phrase. Think up a unique phrase, and make a note of it. Then, assign the same bind phrase in each of your ELRS devices, using the WebUI.
Any of your receivers will now bind to any one of your transmitters. See also Model Match below.
Model Match
ELRS v3.2 and greater support model match. This works like model match in ACCST radios, and is designed to prevent crashes as a result of selecting the wrong model.
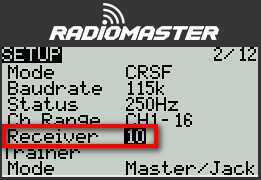
To use model match, you first assign a unique 'receiver number' in the transmitter's Model Setup menu.
|
| Setting the receiver number in EdgeTX |
Next, switch on the receiver. Then open the ExpressLRS Lua script, select External Devices, and select the receiver. Finally go to the Model Match field and toggle off and on. The receiver number from the Model Setup menu is copied 'over the air' to the receiver.
From now on, the receiver will only respond to setups which have that receiver number (as well as matching bind phrase).
Packet rate
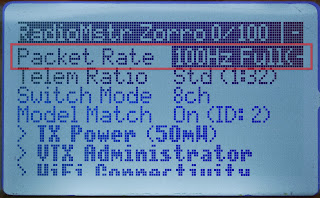
Packet rate is the number of data packets transmitted per second. It's configured in the transmitter module.
|
| Setting the packet rate |
There are various options for packet rate, each with its own tradeoff between latency and range. 100Hz is recommended by the developers for sailplane use.
Switch mode
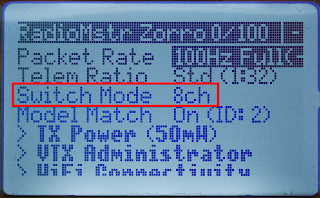
The switch mode determines how many channels are transmitted, and the resolution of each channel. Like packet rate, this is set in the transmitter module using the ExpressLRS script.
The switch modes are described on this page. For fixed wing/line of site use, the devs recommend Full Res 8Ch (I use this on all my models).
|
| Switch mode option in ELRS script |
Dynamic RF
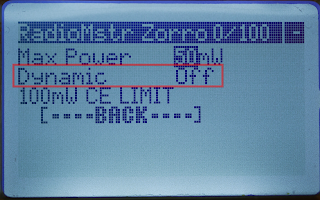
ELRS can be operated using fixed or dynamic RF power. The setting is configured in the Dynamic option of the Lua script:
|
|
Dynamic RF setting. |
If Dynamic is disabled, then the transmitter power will be fixed at a value that you choose. Obviously it should be sufficient to control the model at range. The drawback is that the battery will be drained excessively for much of the flight. For this reason I won't discuss this option further.
From here on, I’ll assume Dynamic is enabled. In this case the transmitter and receiver negotiate the RF power required based on RQly (link quality) telemetry. When the link is good, the transmitter will transmit at lower power. When the link drops, the power ramps up to compensate.
That's all very well, but what happens if telemetry is lost during the flight, for example if the model is out of telemetry range? In that case, behaviour will depend on the arming status. We'll look at how to arm and disarm a little later, but for now, here are the key points:
- If telemetry is lost while the system is armed, the RF module will assume the model has gone out of range and will ramp up to the Max Power setting.
- If telemetry is lost while the system is disarmed, then the transmitter will continue at the power at the moment telemetry was lost. This is useful after a flight, since it means that you can switch off the receiver in the pits without blasting your neighbours (since the transmit power was low due to the proximity of tx and rx).
- If the module is disarmed and you lose telemetry while flying, you’re more likely to lose control since the power won't ramp up. For this reason, the system should always be armed when in the air!
For drone work, where RF power may exceed 250 mW, it's normal to arm in the air, and disarm on landing. However, for line of sight flying, high RF power is not needed. You can set Max Power to 100mW and keep the model permanently armed - this offers sufficient range without interfering with other pilots on the flight line when you switch off the receiver.
Using EU/LBT firmware
If using the EU/LBT variant of the ELRS firmware, the RF power is limited to 100mW. Still easily sufficient for line of sight operation,
Telemetry Ratio
The telemetry ratio (TLM) is the proportion of telemetry frames (downlink) to all frames (uplink and downlink). The smaller the ratio, the higher the telemetry rate.
TLM is configured via the ELRS Lua script. Start with the default ratio, and if you need a higher update rate (e.g. for altitude telemetry) then reduce the ratio.
Signal quality and RSSI alerts
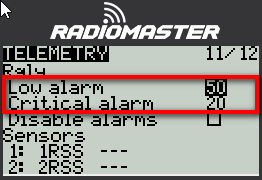
Normally, the built in signal alerts in OpenTX and EdgeTX are based on RSSI values. However when using an ELRS module, the alerts are based on RQly. Recommended thresholds are 50% (low) and 20% (critical). The alert thresholds are set in the Telemetry menu.
You can still have RSSI alerts if you wish, however you'll have to roll your own using logical switches and a special function. The thresholds for the alerts will depend on the switch mode and packet rate. For more info see signal health.
|
| Setting the alarm thresholds in EdgeTX |
Setting the failsafe
Failsafe may be set via the ExpressLRS script. Select 'Other Devices', choose the receiver, and then Set Failsafe Pos.

|
| Failsafe option in receiver menu |
Sharing ELRS configurations between models - NOT
ELRS configurations can be shared between models. For most pilots, it's a 'gotcha' rather than a useful feature.
The way it works: the transmitter module can store multiple ELRS configurations, each identified by the receiver number that you entered in the EdgeTX RF settings.
If you alter the ELRS configuration of one model, the changes will be reflected in all models with the same receiver number - and you may not know until you switch to another model and find that the configuration has mysteriously changed.
To avoid this, each model should be assigned a unique receiver number. That way, any change that you make will be specific to that model alone. Maintaining a list of receiver numbers and models will help you keep track.
Arming [updated 2025-12-09]
In this section I'll explain how to manage arming. Please also read the section above on Dynamic RF.
Arming overview
ELRS incorportates an 'arming' function, originally conceived for use with flight controllers. Of course, sailplanes don't have flight controllers or even motors, so you might think that the arming function can be ignored. However that's not the case, because arming impacts the RF link. In particular, arming must managed in order for Dynamic RF to work properly.
Short story:
- When in the air, the model should always be armed.
- When on the ground, the model should be disarmed, or it can remain armed if Max Power is 100 mW.
To keep things simple, I'm going to assume you're a line of sight flyer, and you've set max RF power to 100 mW. In that case, the module can be permanently armed.
Arming using CH5-high
If using ELRS v3 or prior, the only way to control the arming state is via CH5. This means reserving CH5 for this purpose. The module will always interpret CH5 values >1500 µs as 'armed', otherwise 'disarmed'. This means that CH5 must not also control a servo. If CH5 is already assigned to a servo, it should be swapped with a free channel. This can be done using my ChannelChanger script.
For LoS flying:
- Set RF Power to 100 mW
- Create a mix for CH5 with source = 'MAX' (permanently armed)
You may be wondering: does reserving CH5 as an arming indicator in EdgeTX mean that you lose the use of the CH5 pins on the receiver? Fortunately no, because you can configure the receiver to divert another channel to the CH5 pins. The obvious candidate is the channel that you swapped with CH5 earlier. To alter the mapping you can use either the ExpressLRS script or the receiver's WebUI.
Arming via ON switch
Starting with ELRS v4, arming can be accomplished either using the CH5 method described above, or directly via a switch. The latter is the better option, as it avoids the need to reserve CH5.
To use the switch method you must be using EdgeTX 2.11.0 or greater, in which case you'll see an additional 'Arm using' option in the Model setup>RF menu. For more info see v4.0.0 RC1 release notes.
For LoS flying:
- Set RF Power to 100 mW
- In the Models>RF menu, set arm using = 'Switch'. Set switch = system 'ON' switch. This will leave the module permanently armed.
Note: all the above assumes a Max Power of 100 mW. If using higher power, please ensure that the module is disarmed before switching off the receiver. This means actively managing the arming flag. I won't go into the details here, in order to keep things simple for the primary audience of fixed wing/LoS pilots.
Benefits and drawbacks of ELRS
If you've got this far, congratulations, you're good to go with ELRS!
Finally, here are some thoughts on ELRS compared with traditional protocols like ACCST:
- Greater range means no more 'RF signal low/critical' alerts
- Dynamic RF power
- Remote configuration
- Based on well-proven open source project
- No need for frequency tuning (cf. MPM with ACCST)
- Lower price hardware
- Considerably more complex configuration
- Higher current drain of both tx and rx
All in all, ELRS is an exciting development for LoS flyers, and I'm sure we are going to hear more about it in the coming months. These really are interesting times!

7 comments:
Hi Ken, Ch5 is interpreted as the arming state regardless of resolution. Below centre (<1500us) is unarmed and above is armed. So to do it properly it’s still necessary to take control of Ch5 even if the servos are working normally.
Thanks Mike,
I saw the discussion in RC-groups and understood that it's important to take care of.
So I deleted my question before I saw your kind answer.
Thanks
Thanks Mike, very useful.
I understand that ELRS now also works with FrSky X18, X20 with Ethos. Any chance you could update this blog with that in mind including any gotchas.
Any idea if all the telemetry would work (e.g. Vario) with Ethos, I read something about different protocols (CRSF) so am not sure how Ethos would handle that - unlesss it's all taken care of with the code loaded onto the tx?
@Jerry As I understand it, Ethos at supports ELRS via an external ELRS or TWIN module, but I don't have any experience with either.
Great post
Thank you for that well-written, logical explanation. I'm just getting started in the RC hobby after 40 years of wanting to. This article contained bits and pieces I had not found anywhere else. Thanks!
Post a Comment